利用 DBT 与 Protonbase 进行数据仓库建模
在当今数据驱动的商业环境中,企业对于高效、灵活的数据分析和决策支持系统的需求日益增长。数据仓库作为组织内部数据管理的核心,承担着集成、存储和分析大量数据的重要角色。随着技术的发展,传统的数据仓库建模方法逐渐无法满足快速迭代和灵活性的要求。在这种背景下,DBT(Data Build Tool)应运而生,它是一个现代化的数据转换工具,专为在数据仓库中进行数据建模、测试和部署而设计。
结合DBT的数据建模能力和ProtonBase的存储优势,可以创建一个强大、灵活且易于维护的数据仓库环境。 本文将探讨如何使用DBT和ProtonBase进行数据仓库建模,从搭建数据管道到实现数据转换。
准备工作
- 安装Python3,具体可访问Python官网 (opens in a new tab)下载或根据系统包管理器进行安装;
- 安装Git,具体可访问Git官网 (opens in a new tab)下载或根据系统包管理器进行安装;
- 下载VS Code编辑器 (opens in a new tab);
- 安装dbt并初始化项目;
安装dbt
打开终端,并执行pip3 install dbt-core dbt-postgresql
dbt建模
基本概念
schema.yml文件主要用于定义表的元数据信息(描述、tag、测试集等);- seed,用来加载csv文件,可用来导入外部维度表,或一些比较小的测试数据集;
- model,通过写模板SQL进行建模;
- 通过source函数,可以关联model与source的关系,实现血缘管理,比如
select * from {{ source('public', 'et') }}; - 通过ref函数,可以关联不同的model之间的关系,实现血缘管理,比如
select * from {{ ref('base_model') }}
- 通过source函数,可以关联model与source的关系,实现血缘管理,比如
- source,用来定义源表(表结构定义、数据维护不在dbt内完成);
schema.yml样例
详细配置参考官方文档 (opens in a new tab)
version: 2
sources:
- name: ods
database: example # 源表数据库
schema: public # 源表schema名称
tags: ['ods', 'raw'] # schema级别的表,下属table、view都会继承
tables:
- name: ods_table0 # 表名
tags: ['table_tag'] # 表级的tag
columns:
- name: id
type: integer # 列类型,可不填,由dbt自行推断
description: 'PK of ods_table0'
tests: # 表约束测试
- not_null # 该列没有空值;
- unique # 该列没有重复值
# ... # 可编写自定义SQL测试
# ... 此处可继续定义其他表信息
models:
- name: my_first_dbt_model
description: 'A starter dbt model'
columns:
- name: id
description: 'The primary key for this table'
tests:
- unique
- not_null
seeds:
- name: country_codes # 这个表对应的 seeds/country_codes.csv 文件
description: 'list of ISO-3166 country codes, https://en.wikipedia.org/wiki/List_of_ISO_3166_country_codes'
columns:
- name: short_name
type: text
description: 'country name'
tests:
- not_null
- unique
- name: alpha2code
type: text
description: two-letter country codes
tests:
- not_null
- unique
- name: alpha3code
type: text
description: three-letter country codes
tests:
- not_null
- unique
- name: numeric_code
type: integer # 一般情况下,dbt会自动推断csv各列的数据类型,如推断错误可通过主动声明类型的方式更改为正确的类型
description: 'three-digit country codes which are identical to those developed and maintained by the United Nations Statistics Division, with the advantage of script (writing system) independence, and hence useful for people or systems using non-Latin scripts.'
tests:
- not_null
- unique
- name: iso3166_2
type: text
description: Codes for the representation of names of countries and their subdivisions
tests:
- not_null
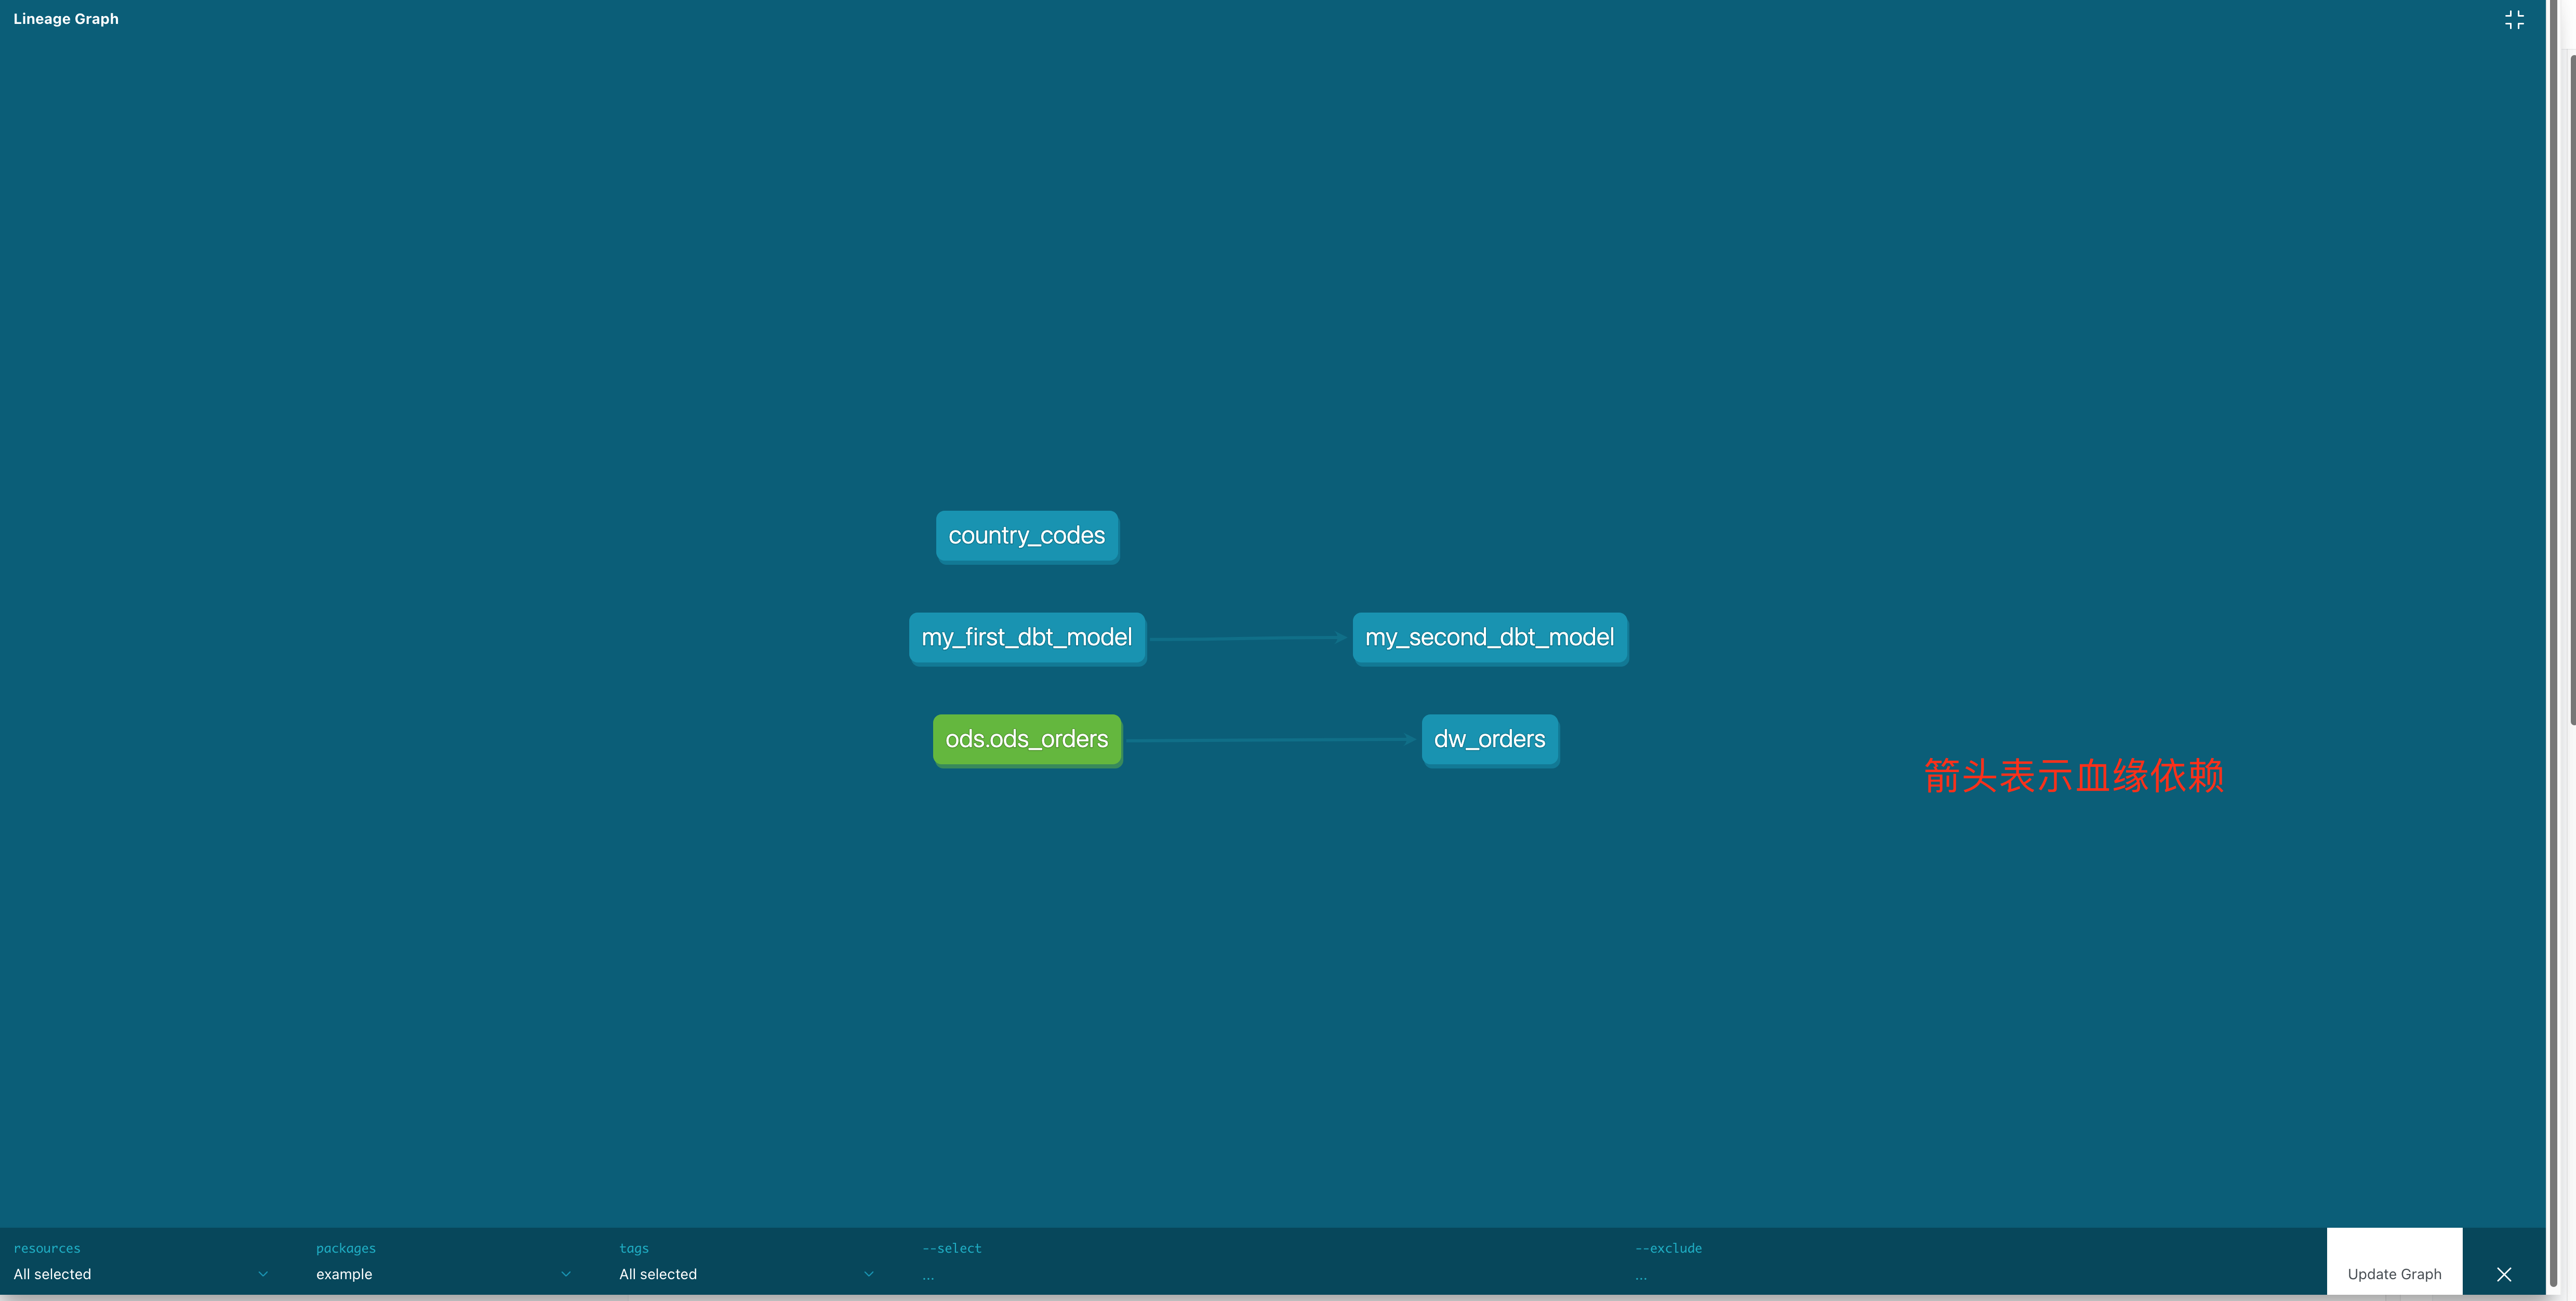
- uniquedbt血缘管理图样例
- 通过
source、ref函数进行关联的模块,会自动生成血缘关系图。

建模实操
初始化dbt项目
打开终端,并执行
dbt init example
# 根据提示配置项目

cd example
ls # 查看项目模板文件

# 初始化版本管理
git init
git add ./
git commit -m 'init repo'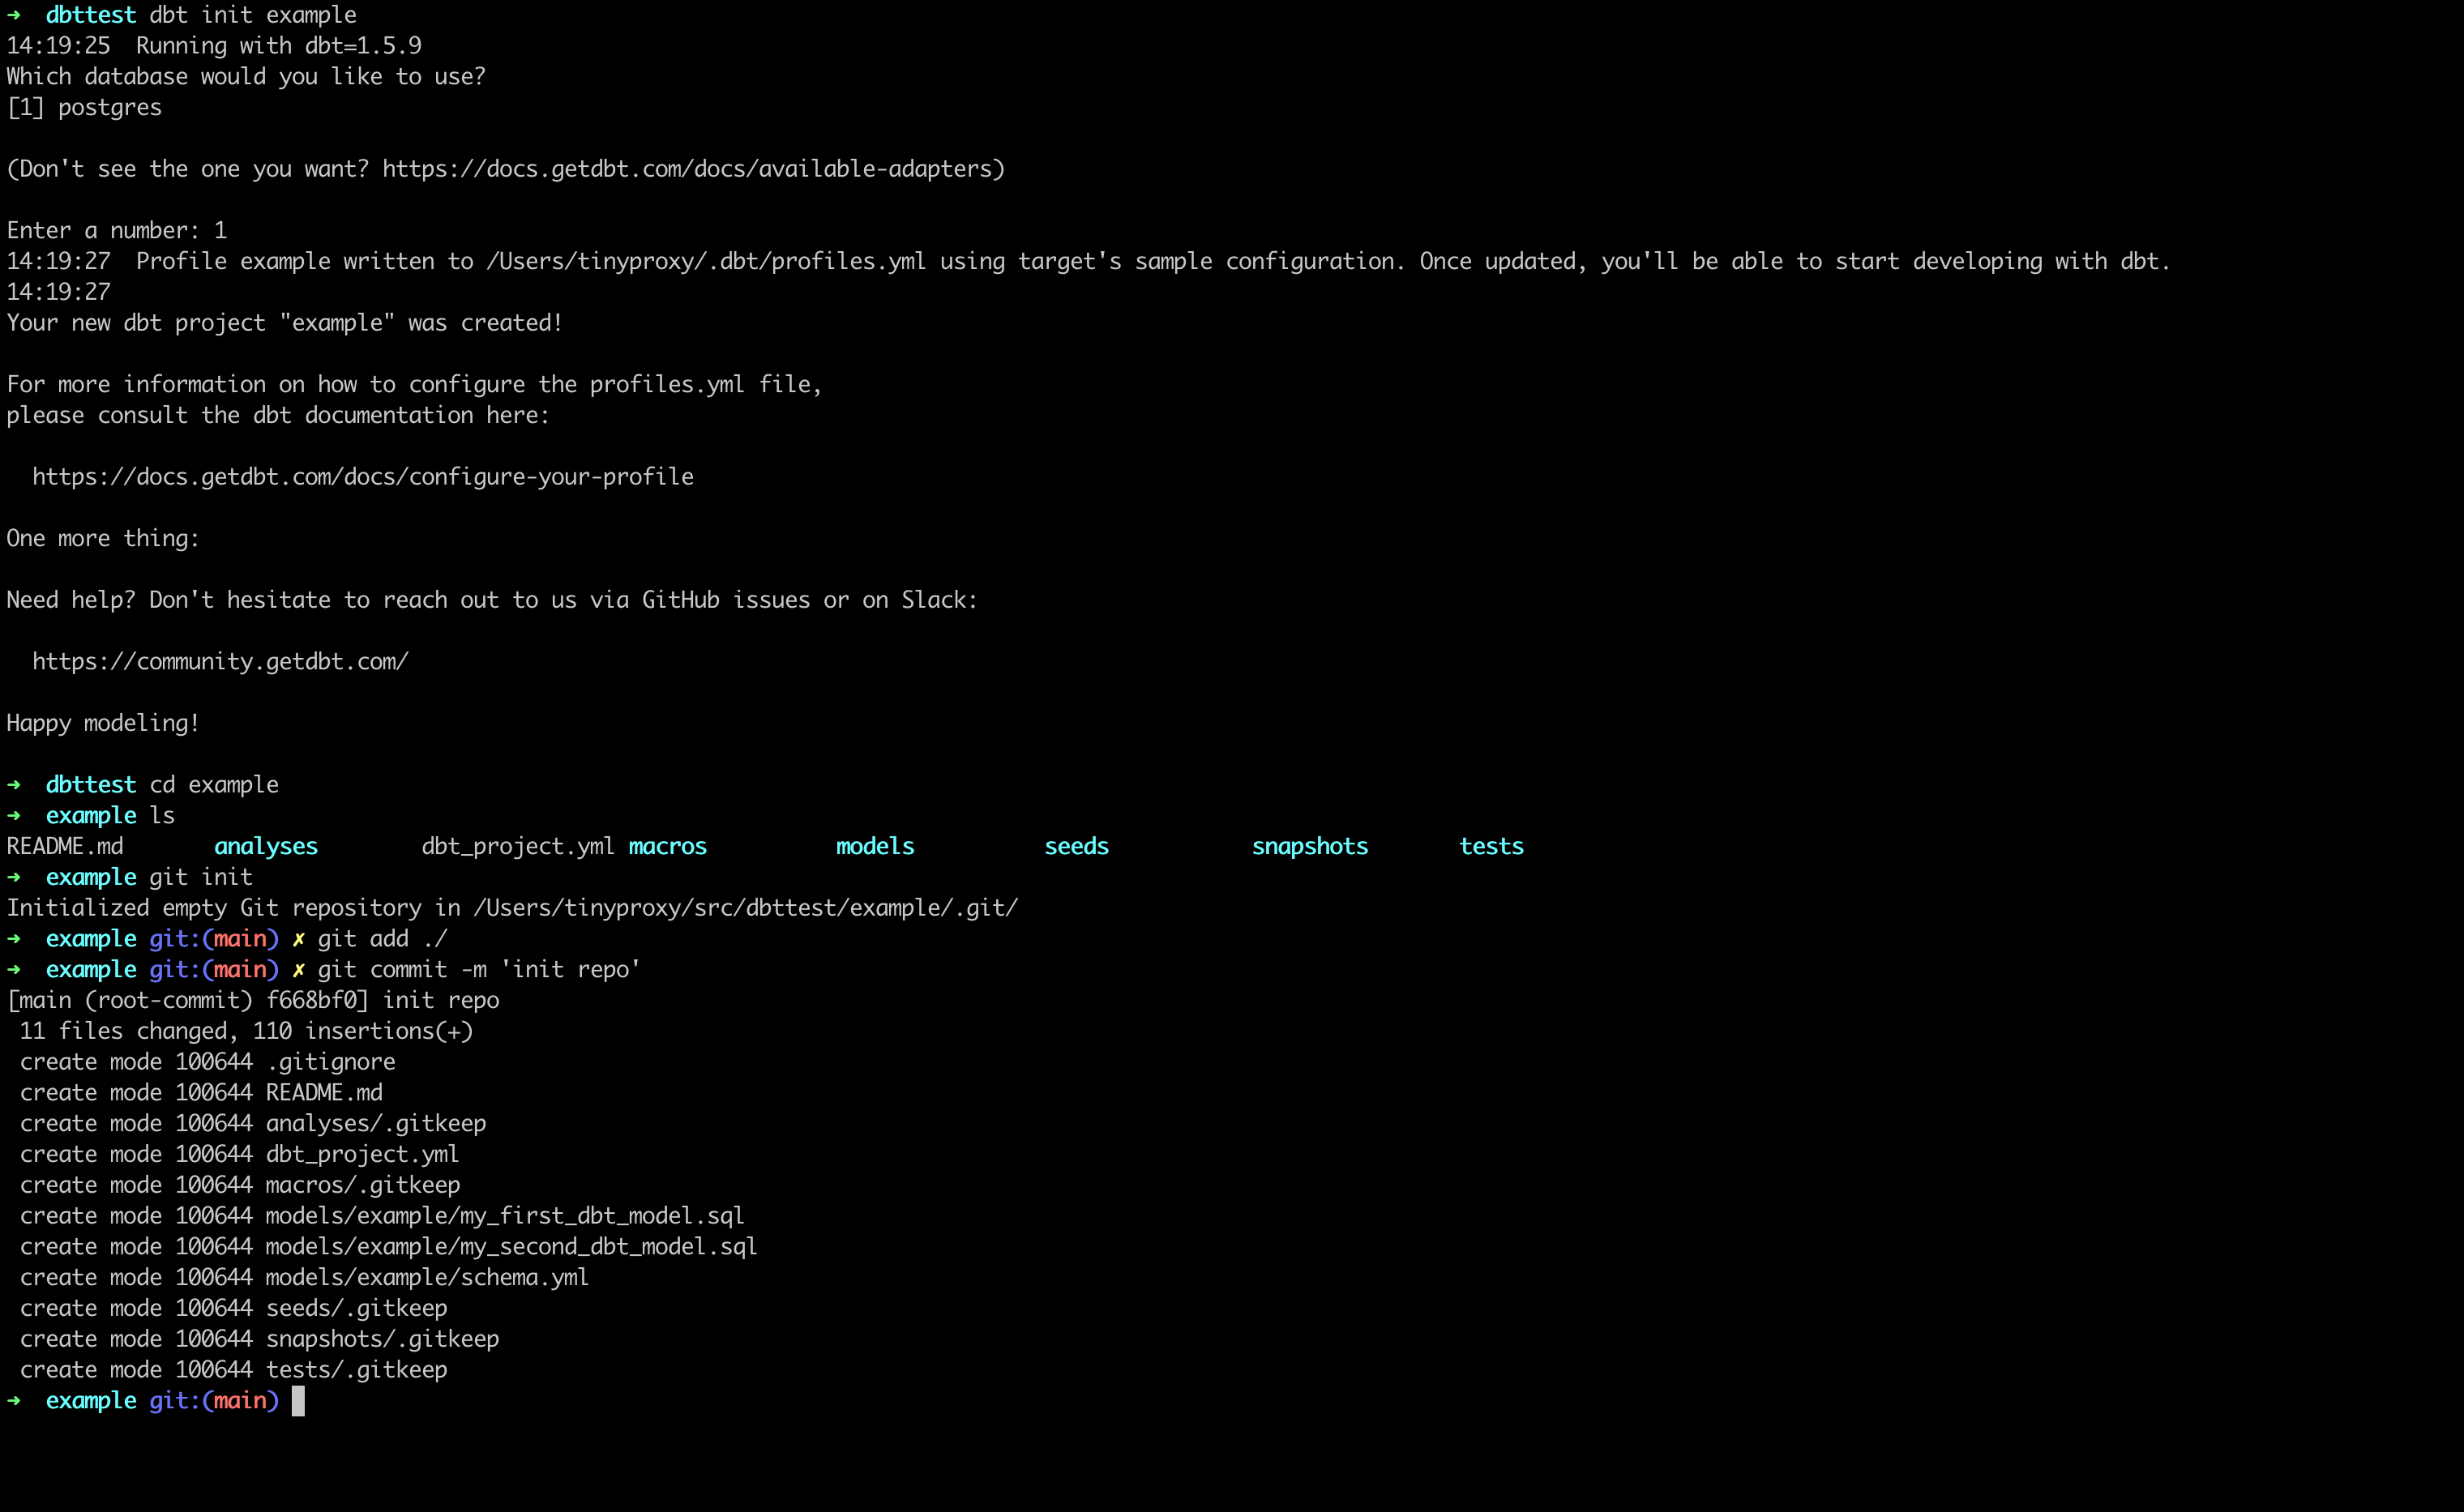
执行内置建模、测试
dbt run     # 执行建模语句
dbt test    # 执行模型测试case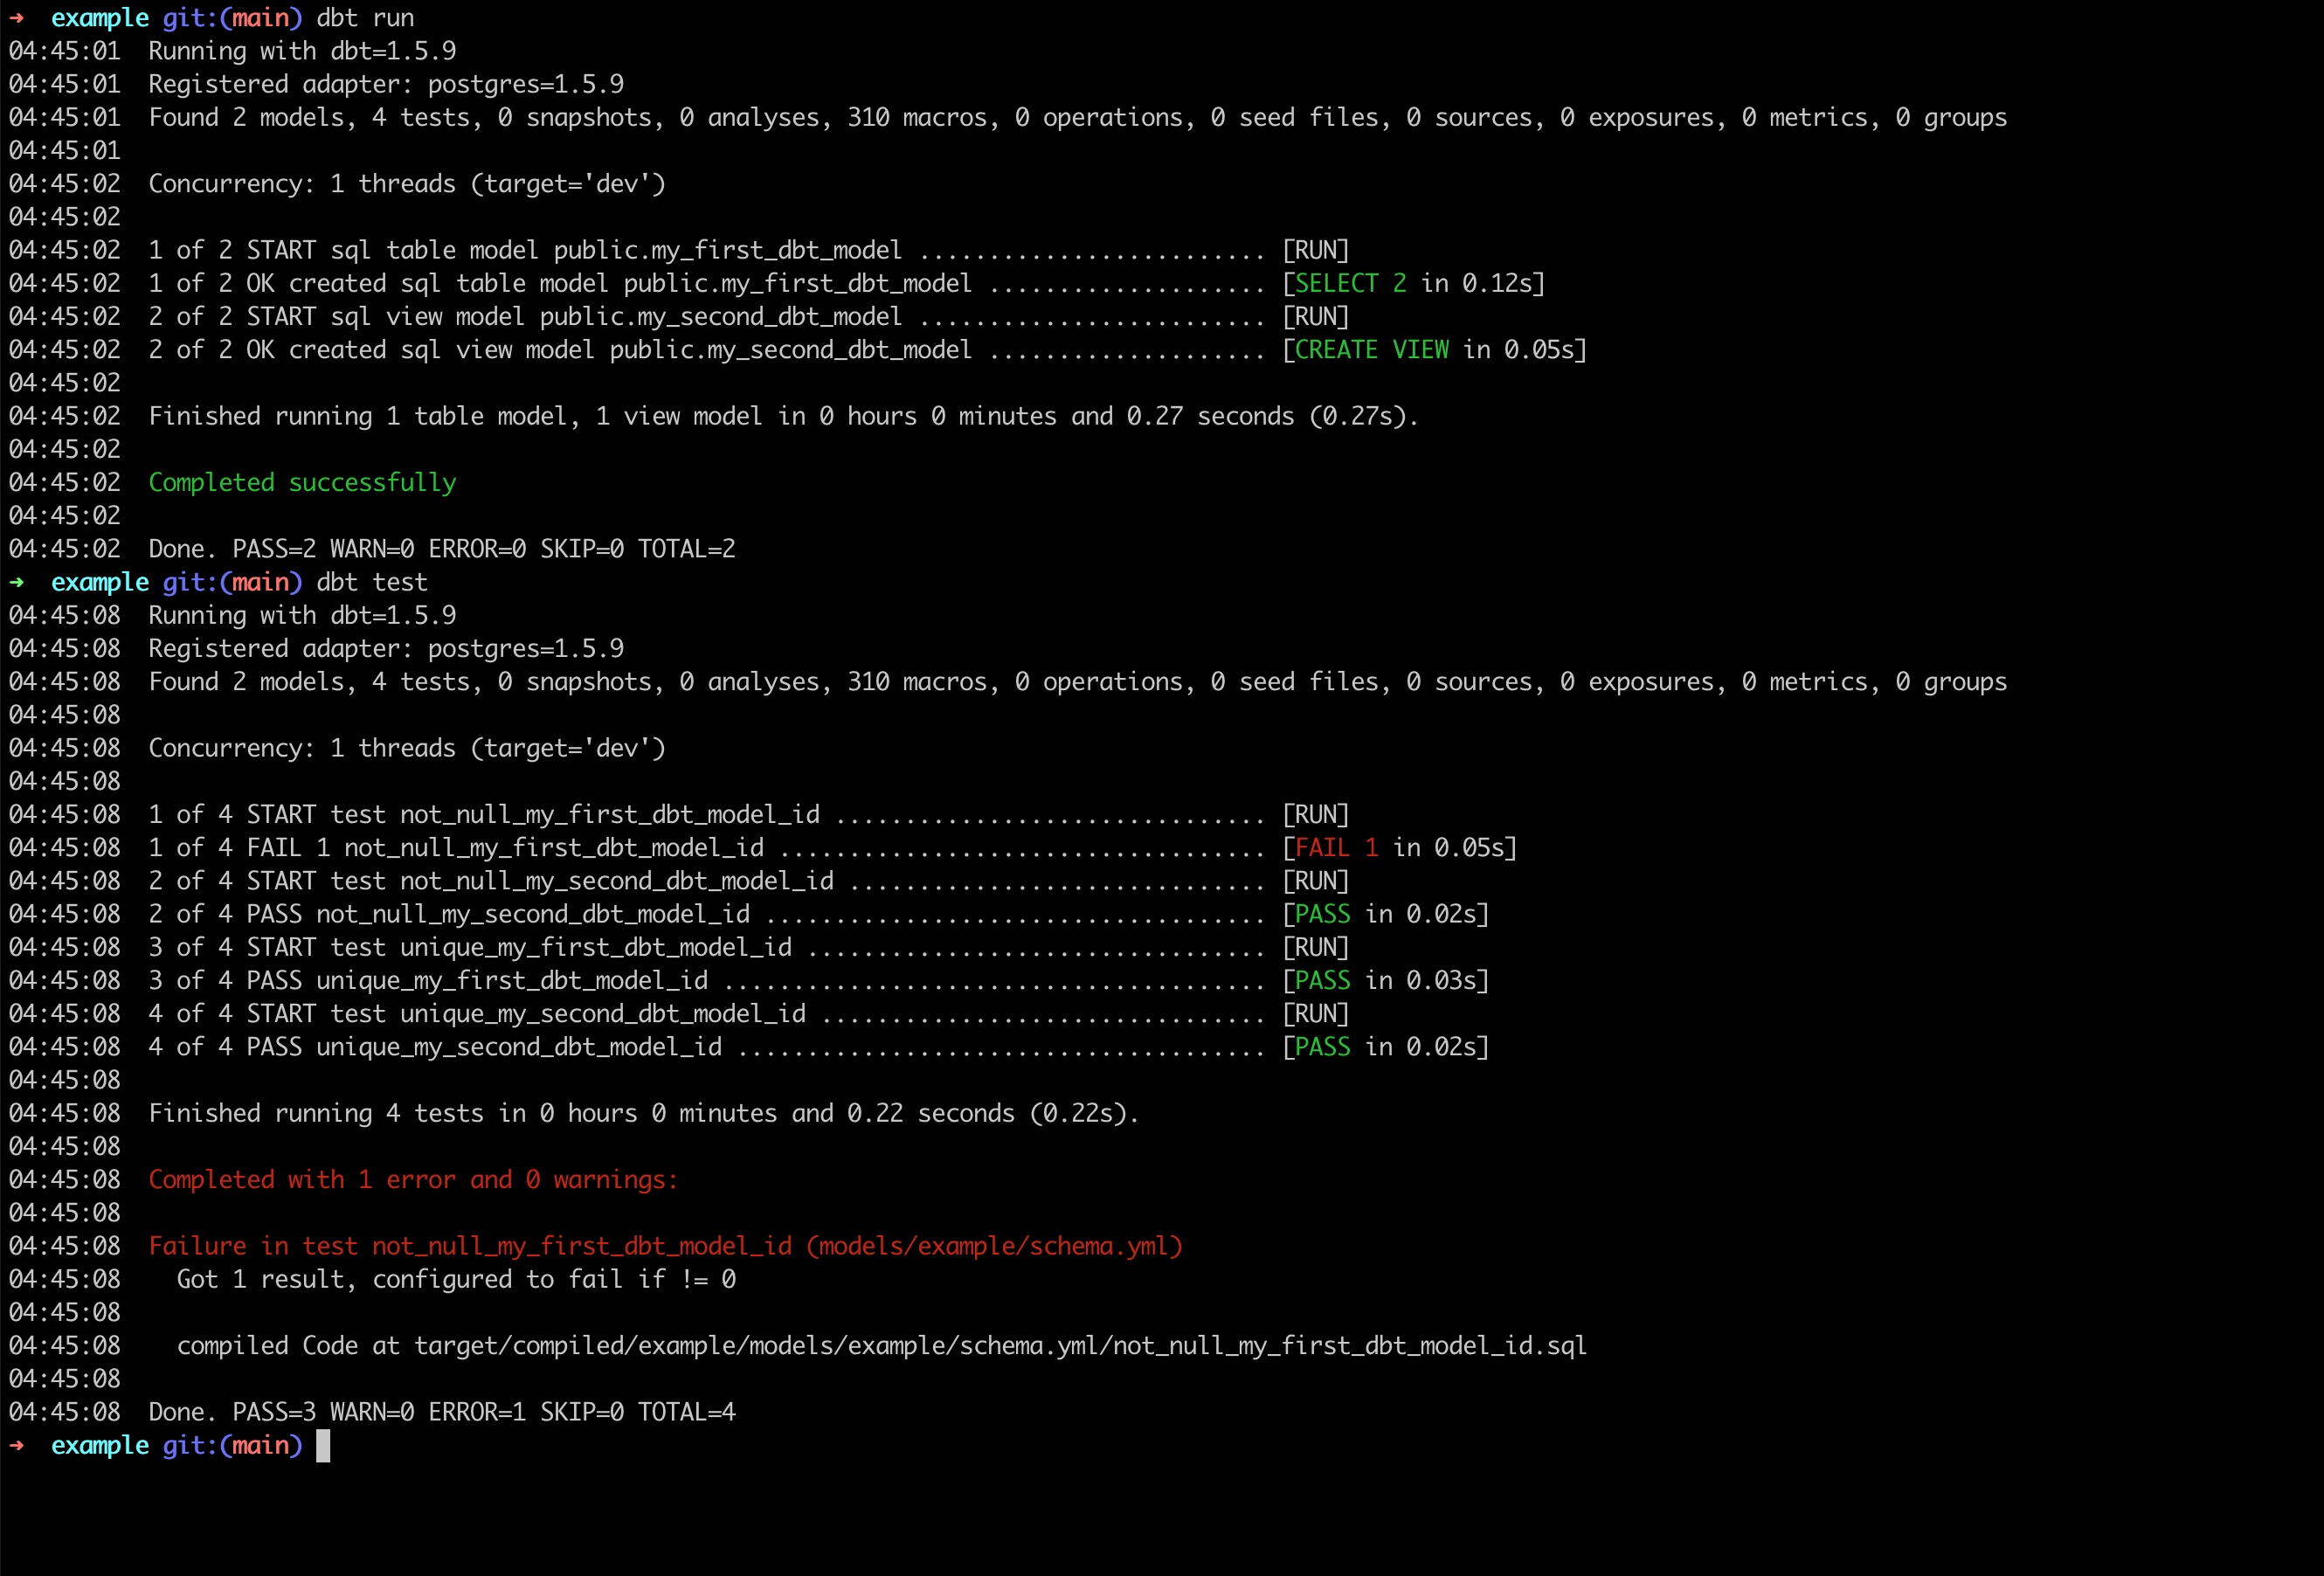
执行dbt test发现存在测试错误报告Failure in test not_null_my_first_dbt_model_id (models/example/schema.yml)。
排查文件models/example/schema.yml发现模型my_first_dbt_model定义了not_null测试,而models/example/my_first_dbt_model.sql16行创建了NULL值;
要修复问题,将models/example/my_first_dbt_model.sql27行的-- where id is not null 替换为 where id is not null。
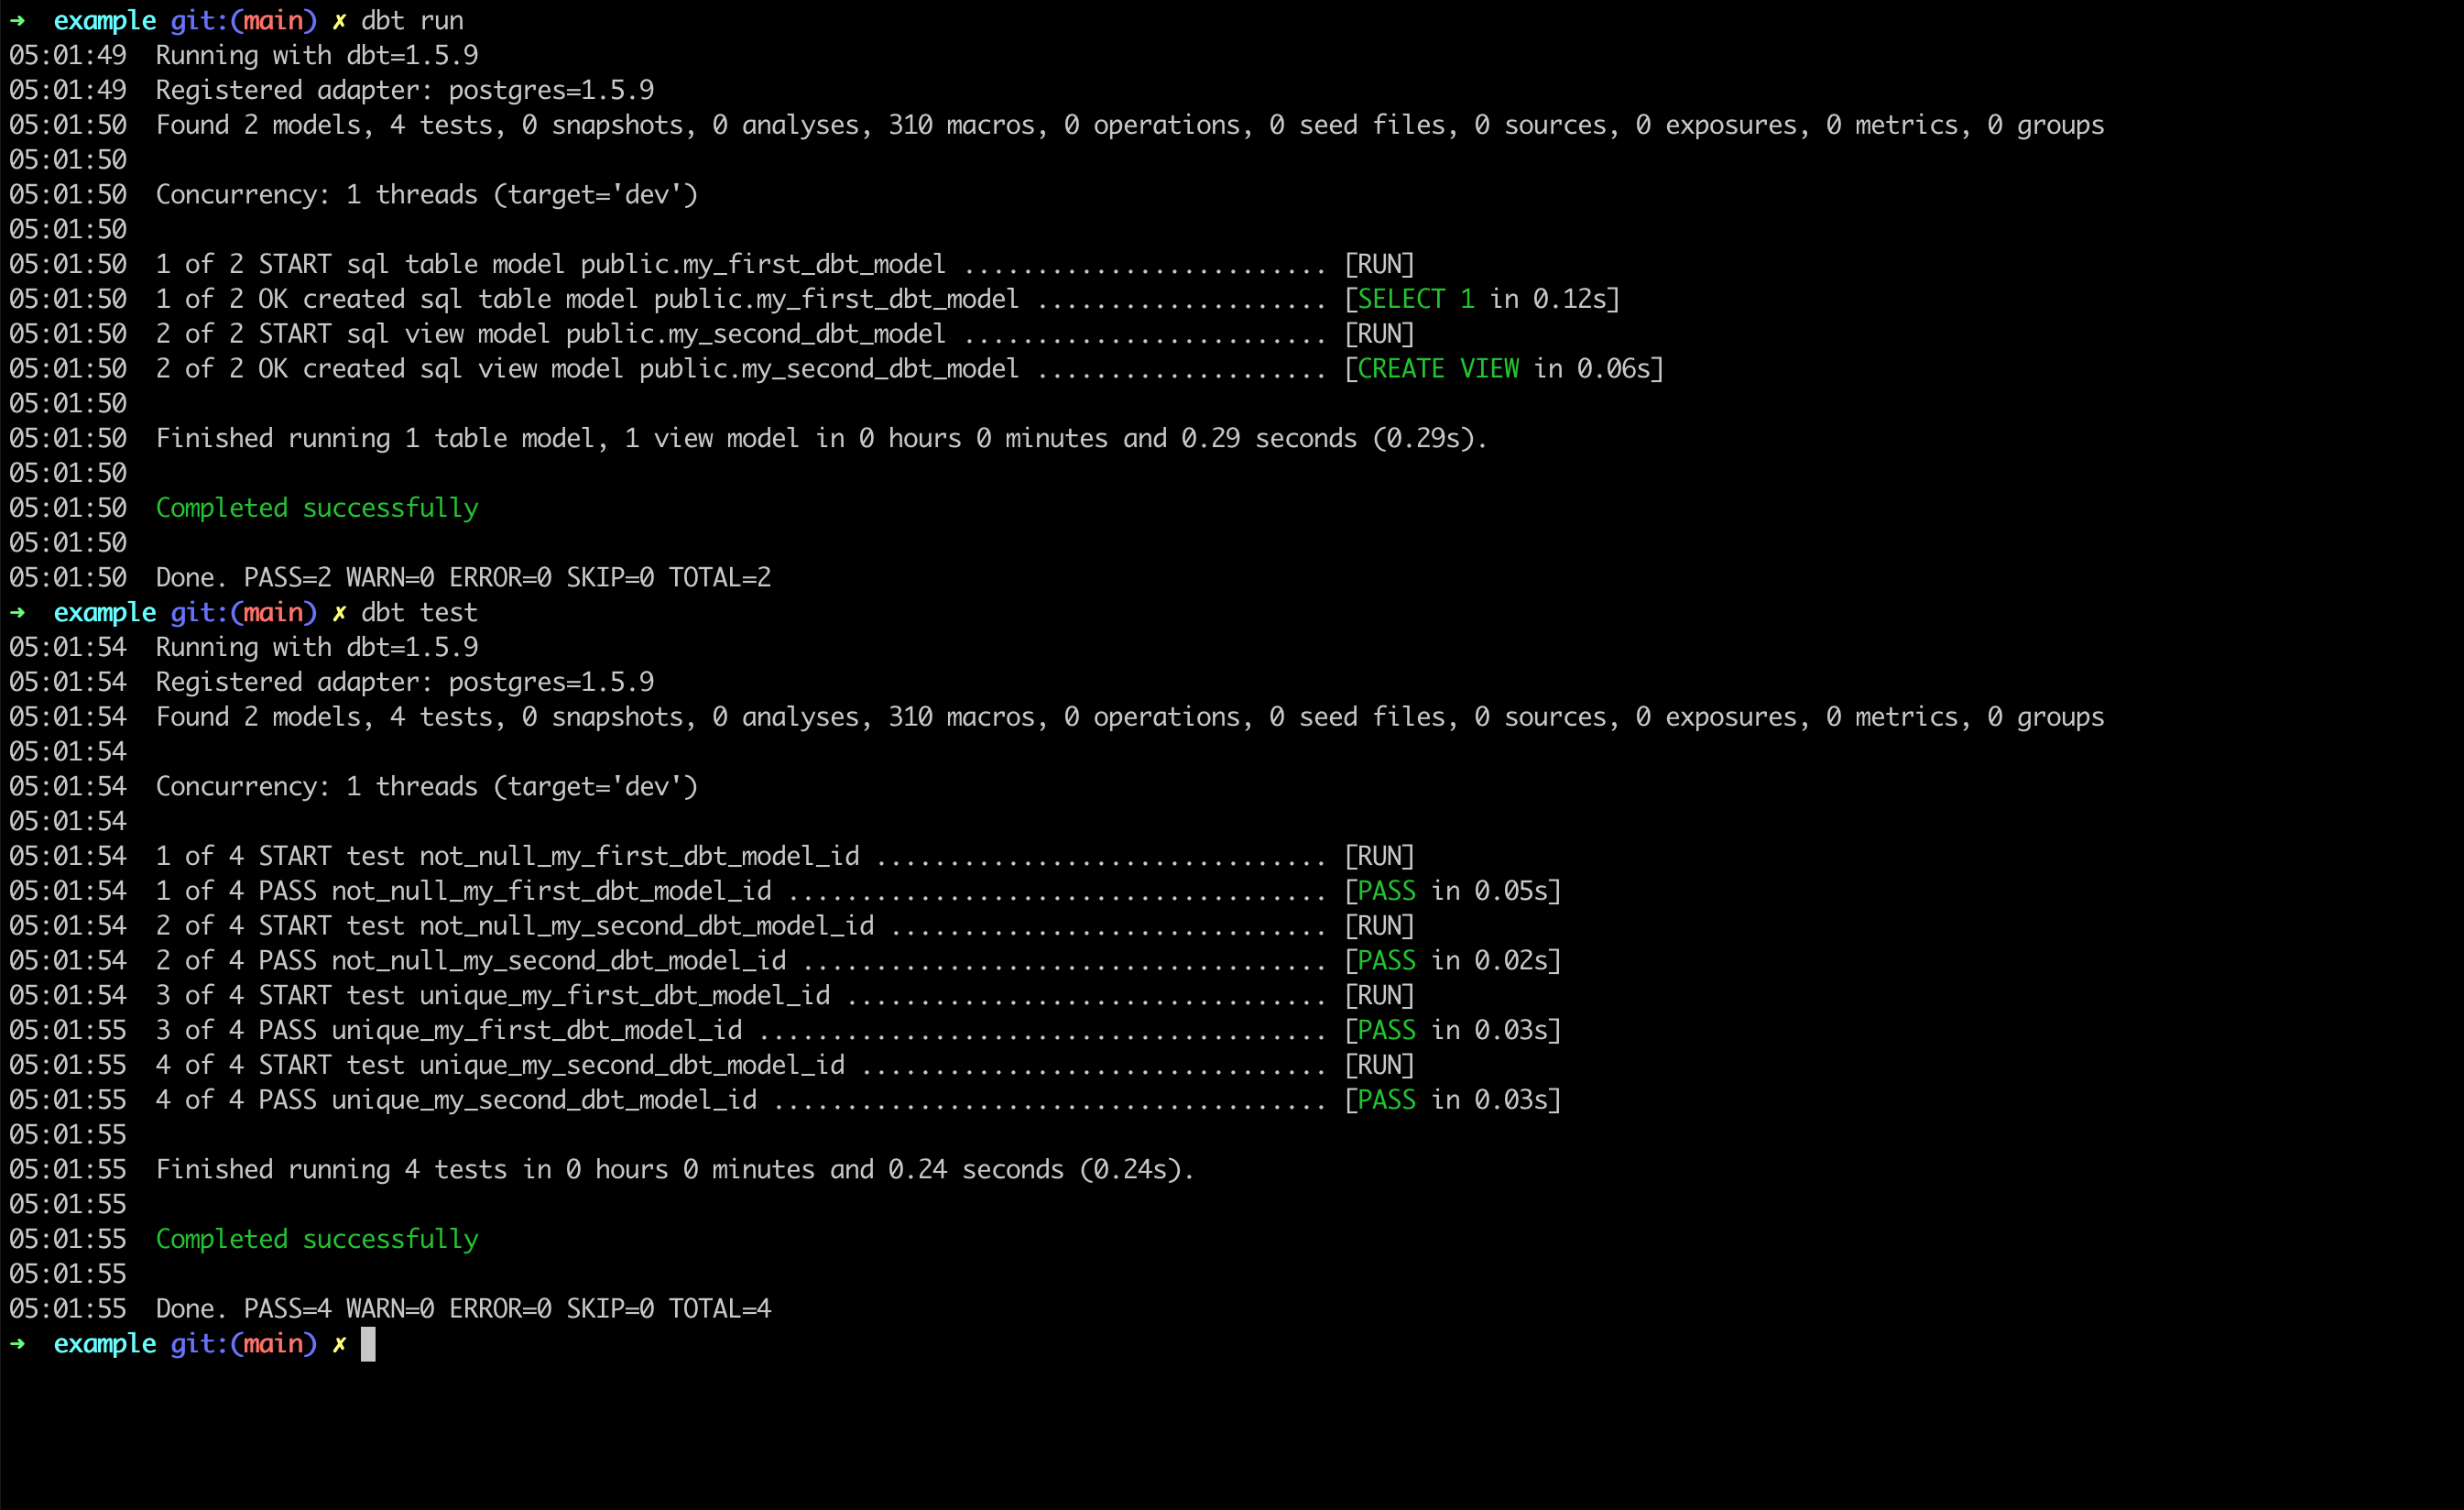
再次执行dbt run; dbt test发现问题已解决。
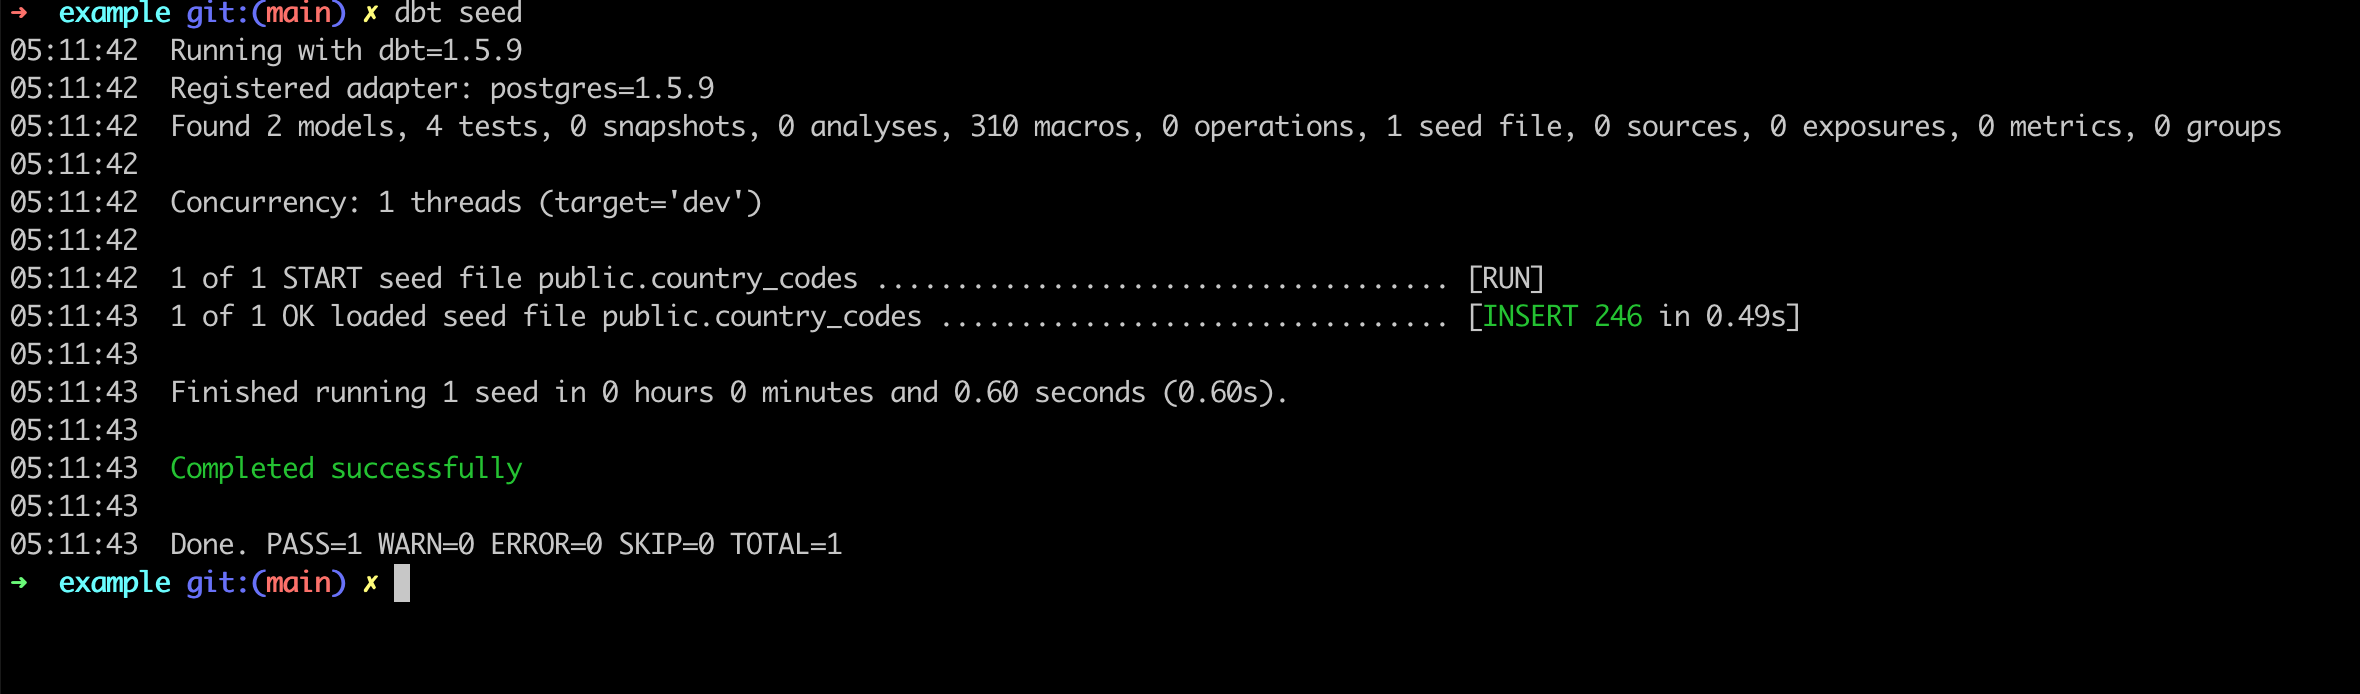
通过seed上传csv数据
下载文件country_codes.csv (opens in a new tab),并放到seeds文件夹内,然后执行dbt seed
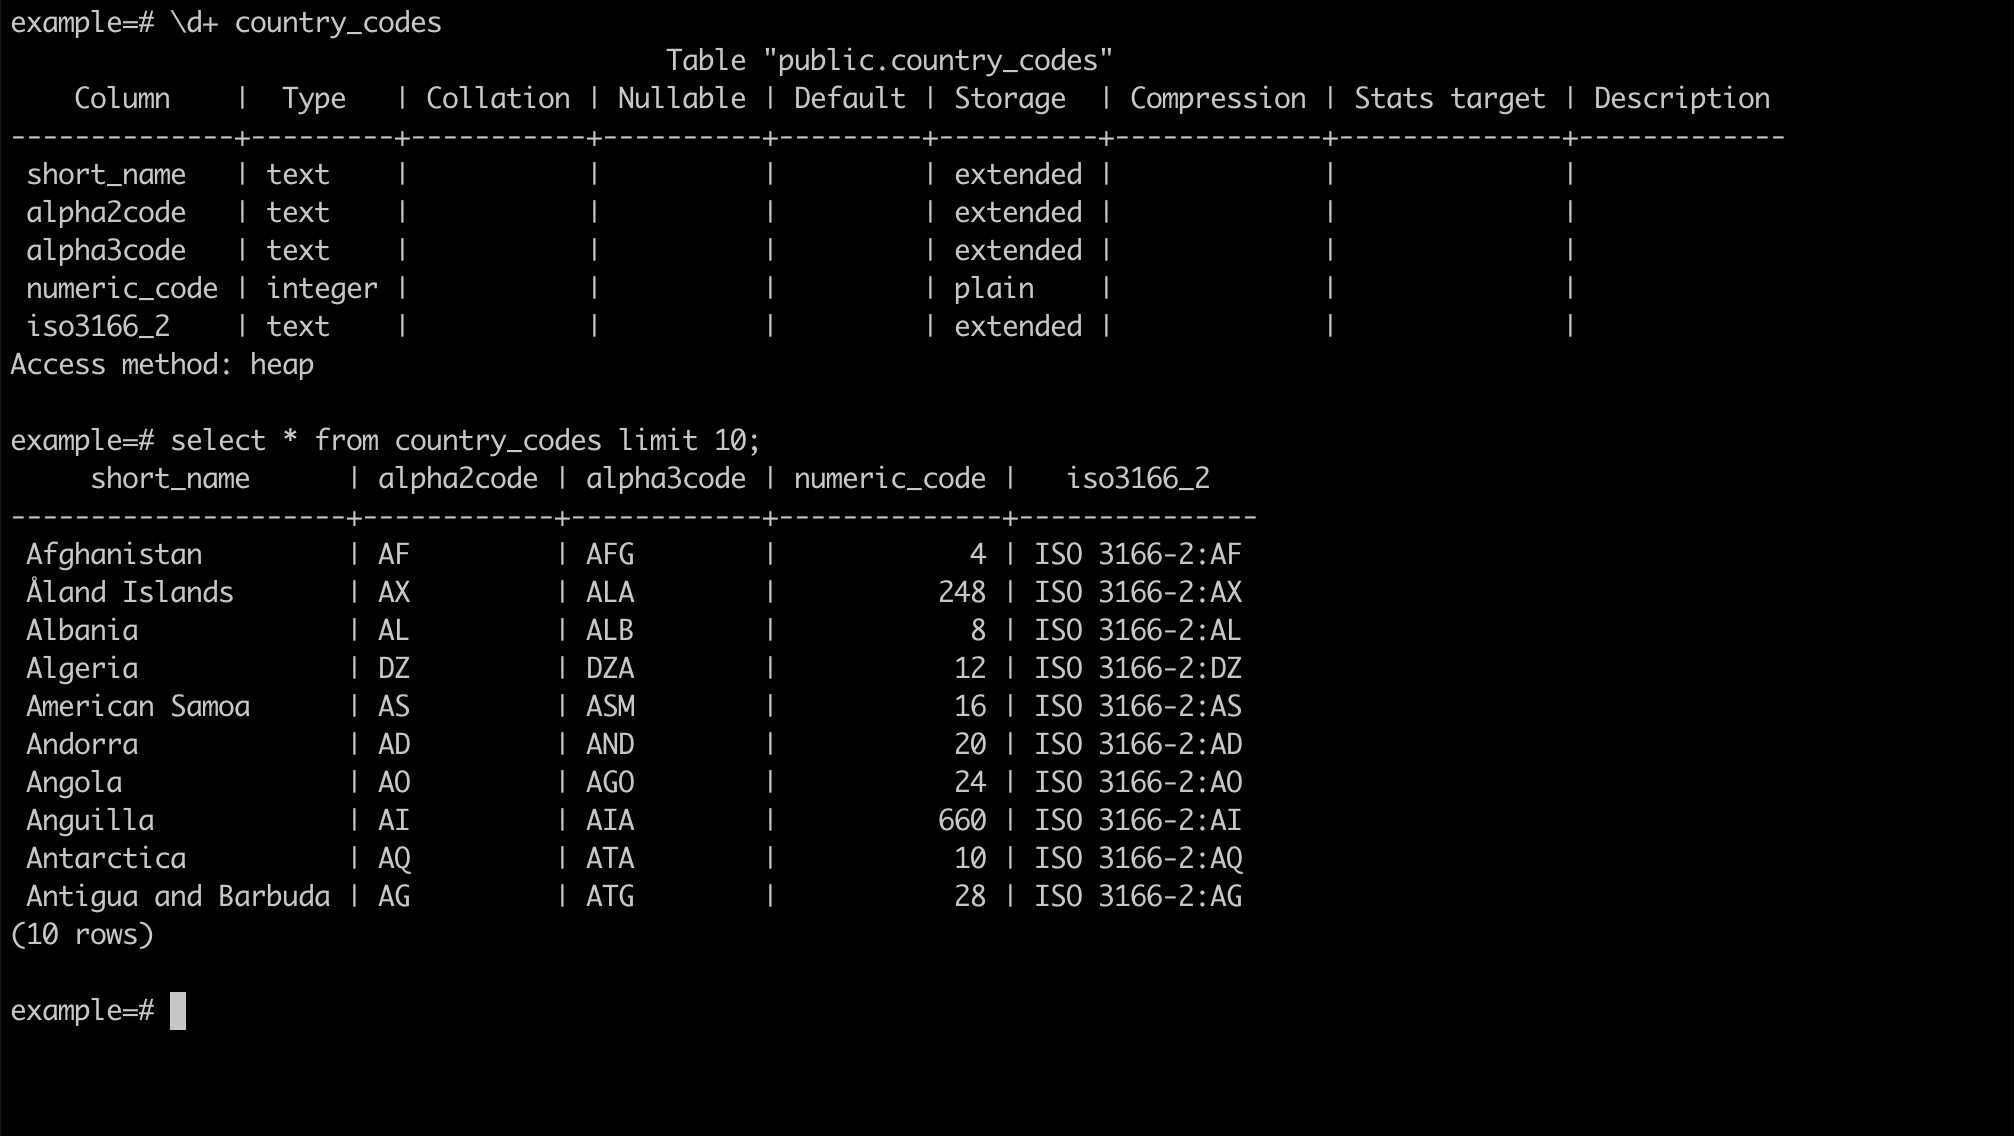
通过psql连接上 ProtonBase ,查看country_code
\d+ country_codes


select * from country_codes limit 10;
编写自定义测试
以country_codes为例,创建文件seeds/schema.yml,复制以下内容
version: 2

seeds:
  - name: country_codes
    columns:
      - name: short_name
        tests:
          - unique
          - not_null
          - count_between: # 自定义测试
              range_left: 100
range_right: 300创建自定义测试SQL模板,创建文件tests/generic/count_between.sql,复制以下内容
{% test count_between(model, column_name, range_left, range_right) %}

WITH AGG_RESULT AS (
    SELECT COUNT({{column_name}}) "num" FROM {{ model }}
),
ERROR_RESULT AS (
    SELECT * FROM AGG_RESULT
        WHERE "num" NOT BETWEEN {{range_left}} AND {{range_right}}
)
SELECT * FROM ERROR_RESULT
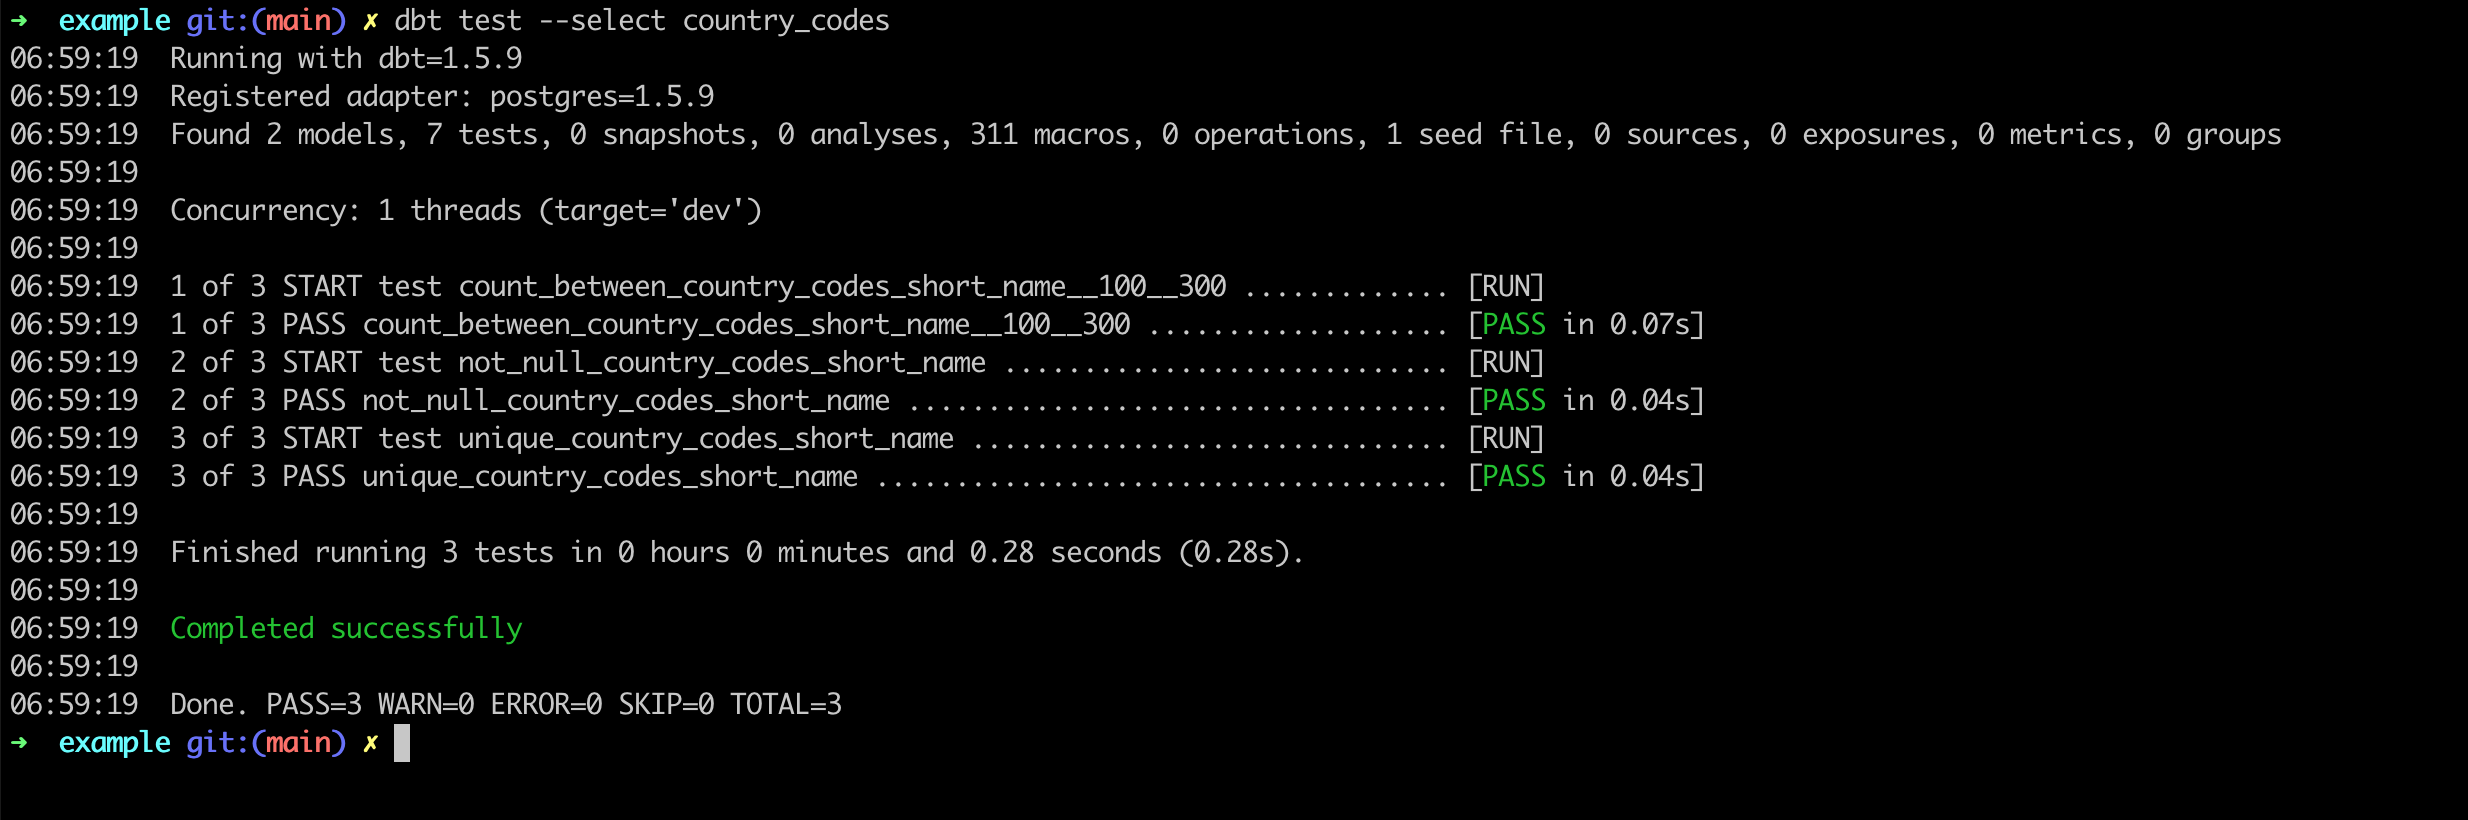
{% endtest %}执行测试dbt test --select country_codes
定义source表,并做初步建模
- 下载外部表ods_orders.sql.gz (opens in a new tab),解压并执行导入
psql ...连接信息... -f ods_orders.sql - 修改
models/erp/schema.yml,追加sources描述
# ...

version: 2

sources:
  - name: ods
    database: example
    schema: public
    tags: ['ods']
    tables:
      - name: ods_orders
        description: '原始订单表'
        columns:
          - name: orderid
            description: '订单ID'
          - name: orderdate
            description: '下单日期'
          - name: shipdate
            description: '发货日期'
          - name: shipmode
            description: '货运方式'
          - name: customername
            description: '客户名称'
          - name: country
            description: '收货国家'
          - name: sales
            description: '销售额'
          - name: quantity
            description: '发货数量'
          - name: discount
            description: '订单折扣'
          - name: profit
            description: '订单利润'
          # - name: ... # other columns
# ...- 假设存在脏数据,有效数据过滤条件为
where sales is not null and sales > 0 - 清洗后的模型模型叫
dw_orders,创建文件models/erp/dw_orders.sql,复制以下内容
SELECT * FROM {{source('ods', 'ods_orders')}}
WHERE sales IS NOT NULL AND sales > 0- 执行
dbt run --select erp创建新模型,并查看新模型;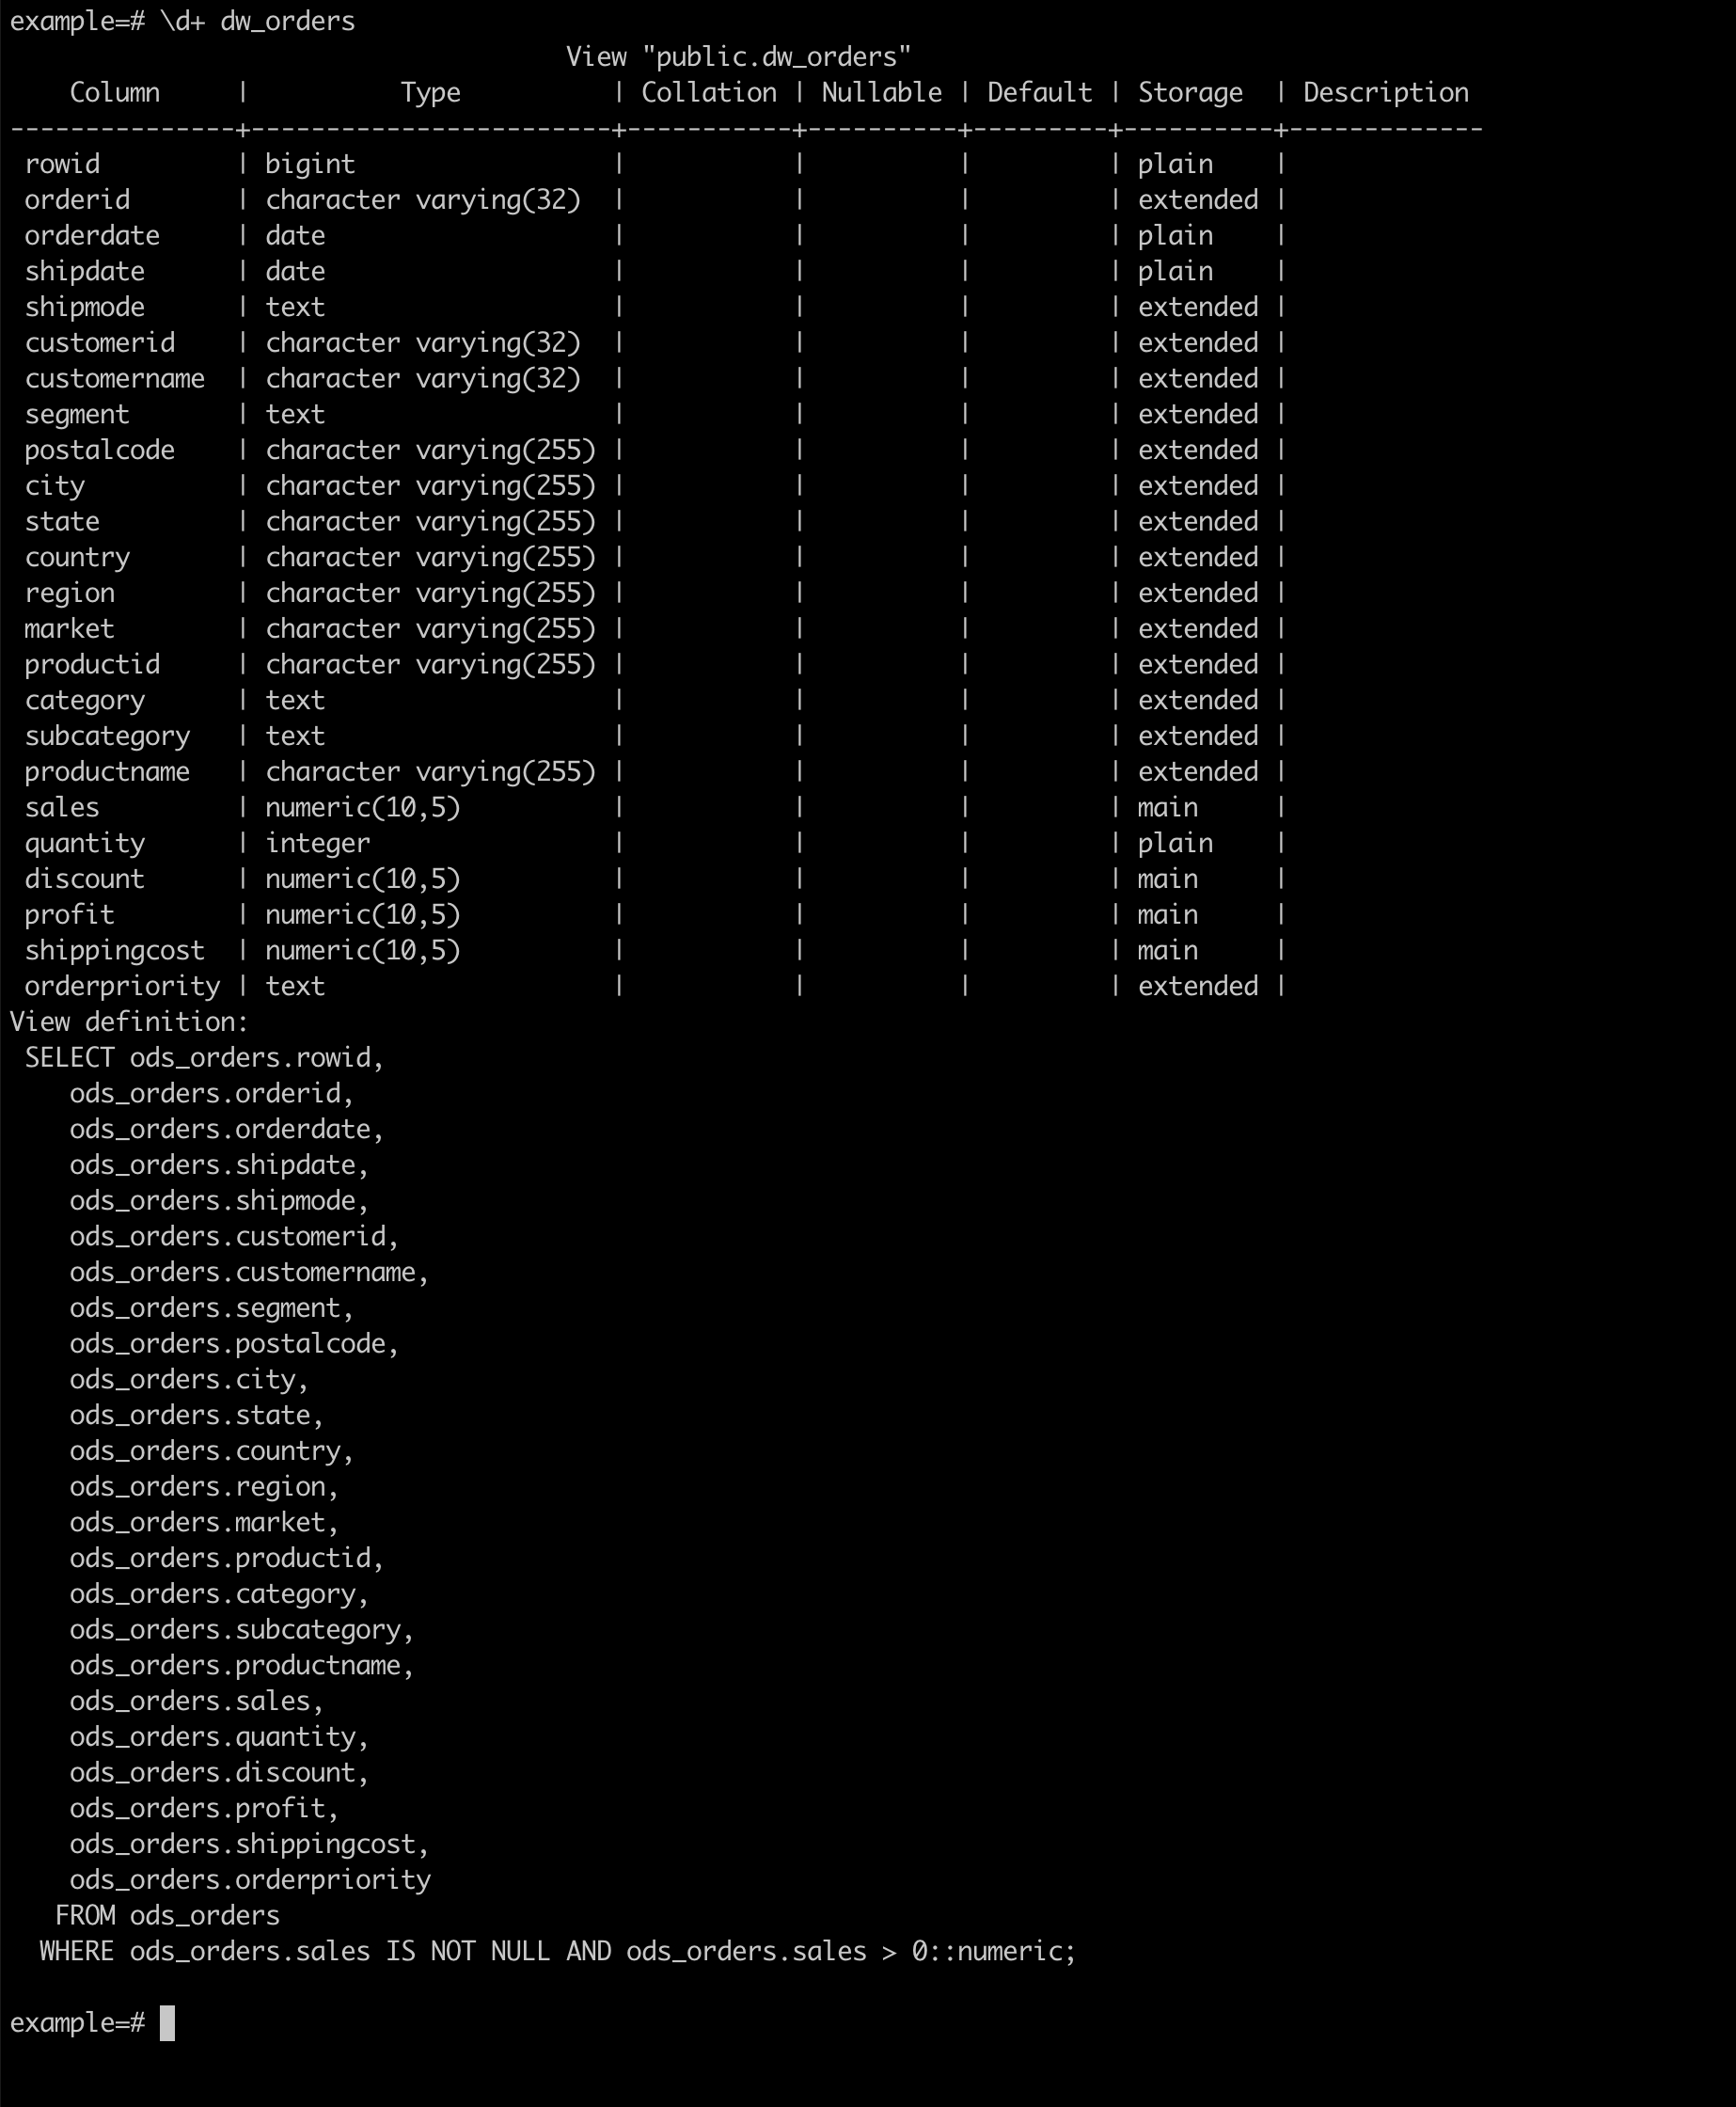
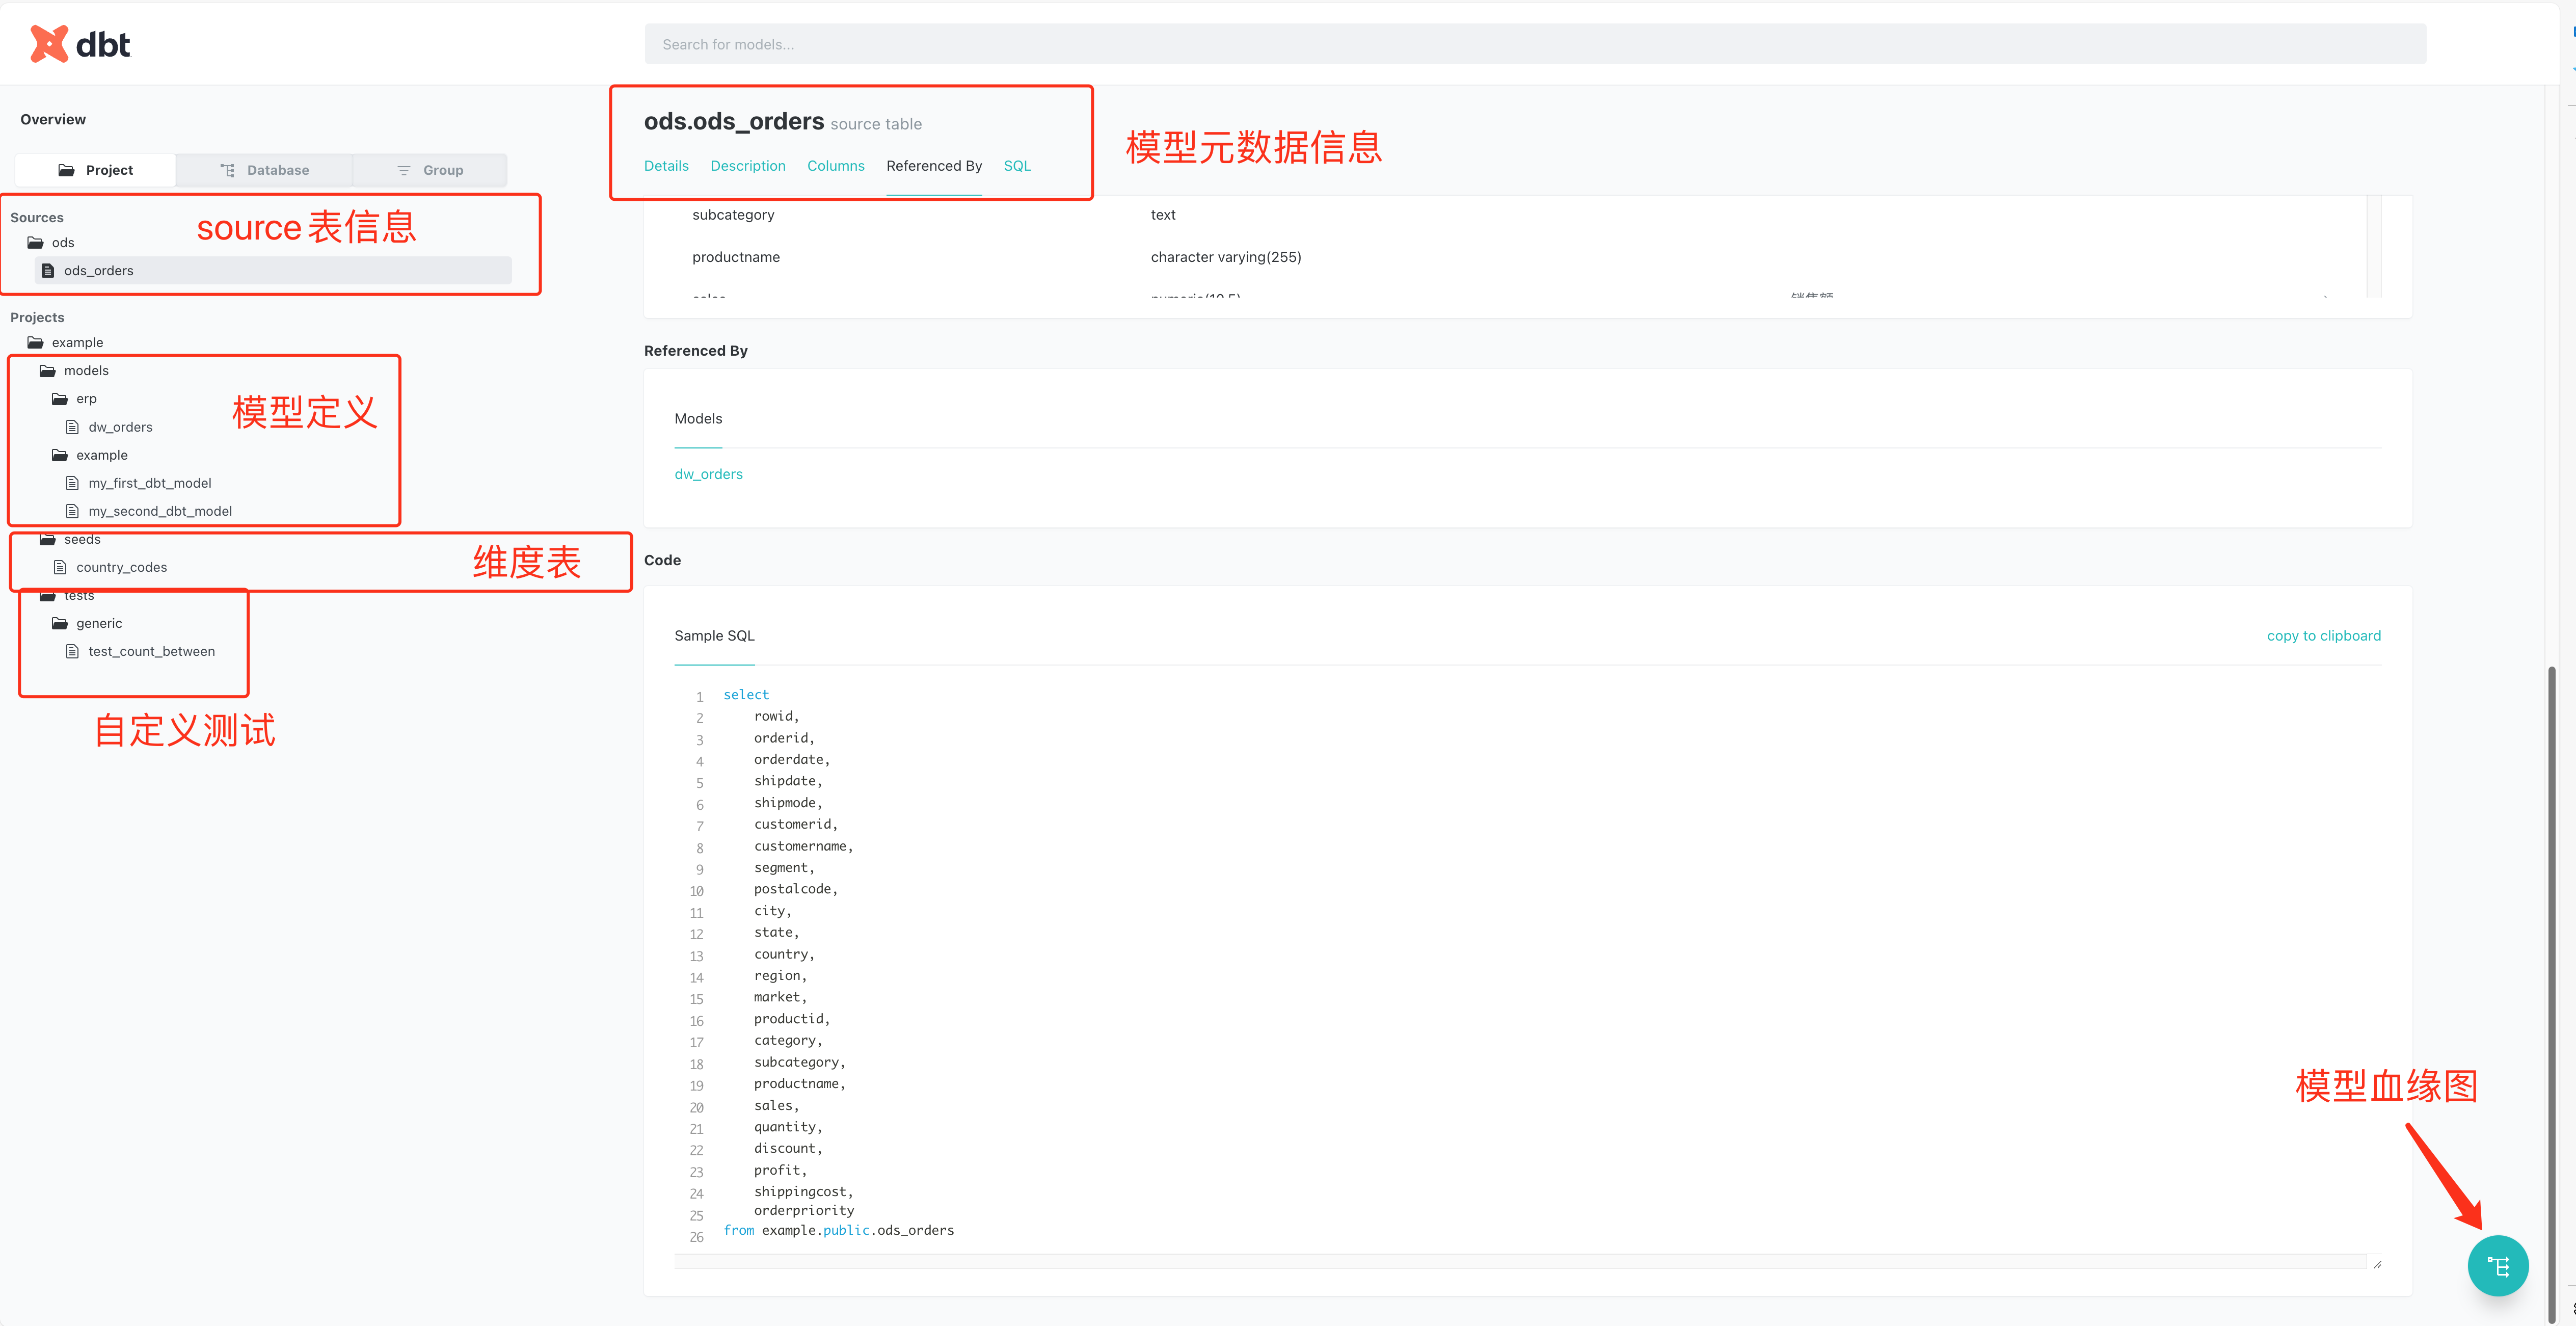
模型文档
- 生成文档
dbt docs generate- 生成的文档在
target目录内,通过ngnix等httpd部署静态站点提供文档访问,配合CI可实现自动版本更新。
- 生成的文档在
- 本地通过web查看
dbt docs serve
附件
- 项目工程文件下载 example.tgz (opens in a new tab),可通过git查看各步骤修改记录。
- 如果需要运行该工程,需要修改profiles.yml文件,并追加以下内容
example:
outputs:
  dev:
    type: postgres
    threads: 1
    host: # 修改为protonbase host信息
    port: 5432
    user: # 用户名
    pass: # 用户密码
    dbname: example # 建模数据库,若example不存在请先执行 CREATE DATABASE example;
    schema: public
target: devprofiles.yml文件位置:- macOS、Linux:
$HOME/.dbt/profiles.yml - Windows:
c:/users/用户目录/.dbt/profiles.yml
- macOS、Linux: